 Polka Dot Apron #1
APRONZ
Patterns and Directions
A soft pleat is :
I believe the original pattern was size 14 for adults and 8 for children You can resize when you create your paper pattern to customize your apron.
You can determine how much bias tape you will need after you cut your pattern out and measure with a measuring tape where you will add bias tape and trims (ball fringe, yarn, lace, etc.)
Please keep in mind that these are vintage patterns and sizes may vary. You might have to increase/decrease yardage and measurements to suit your needs and size.
Polka Dot Apron #1
Materials: Polka Dot Cotton 1 YD., Bias Trim (double fold) in two contrasting colors, snap fastener, sewing threads to match.
How to make patterns refer to PATTERN PAGE
Cutting directions: Do not add seam allowance to pattern pieces. Apron Front 1 Piece pattern NO.1 (pattern page) Side Fronts 2 pieces pattern No. 2 (pattern page) Bib 1 piece pattern No. 3 (pattern page) Pockets 2 pieces pattern No. 4 (pattern page) Ties 2 pieces each 3 ½ “ X 30".
Sewing Directions: Step 1. Baste and stitch apron sections, right sides together. Press seams open. Step 2. Using all bias trim on double fold, trim lower edge of apron with two rows (of contrasting color); Place one row 1" above lower edge and second row 1 3/4" above first row; have open edges of bias at top. Top stitch close to top edges. Step 3. Bind side and lower edges of apron with remaining color bias trim; leave top edge free. Turn upper edge to right side 1/4"; press.
Step 4. Using same shade bias trim as on lower edge of apron place rows of bias 1" from edges of bib, lapping trim at corners. Top stitch close to edges Step 5. Bind all edges of bib with same color of outer edges of apron Step 6. With centers matching, lap lower edge of bib over upper edge of apron 3/8". Top stitch bib in place through all thicknesses. Step 7. Trim lower edge of pocket with two rows of bias trim (same color as lower edge of apron) spacing in the same way. Step 8. Bind all edges of pockets with the same color as outer edge of apron. Step 9. Place pockets in position on apron ; top stitch in place, leaving upper edges free. Step 10. Turn in long edges and one end of each tie and finish in narrow machine hems. Step 11. Fold a soft pleat in raw end of each tie. Place in position at corners of apron (at waistline) on wrong side ; stitch in place. Close points of bib on back with a snap fastener.
 Utility Apron with Cap #2
Materials: Percale 2 yards, pieces of striped cotton in contrasting color ( for piping) sewing threads to match
How to make patterns refer to PATTERN PAGE
Cutting Directions: Add 1/4 inch seam allowance to pattern pieces. Bodice 1 piece Pattern No. 5 (pattern page) Apron 1 piece 24" long X 36"wide. Pockets 2 pieces 7 1/2 " wide X 8" long.
Shoulder straps 2 pieces 2 3/4" X 23" Back Band 1 piece 2 3/4" X 8 1/4". Ties 2 pieces, 4" X 23". Cap 1 piece pattern No. 6 (pattern page)
Sewing Directions: Step 1. cut strips of bias (striped fabric ) 1 1/4" wide. Join pieces together to form continuous strips. Step 2. Turn in edges of bias 1/4" and press; then fold in half to form 3/8" piping. Step 3. Turn in seam allowance on all edges of bodice; press. Step 4. Place piping around bodice, edge of piping extended 1/8" ; baste in place Step 5. Turn in seam allowance at side and lower edges of apron ; press. Step 6. Apply piping to apron in same way as for bodice;
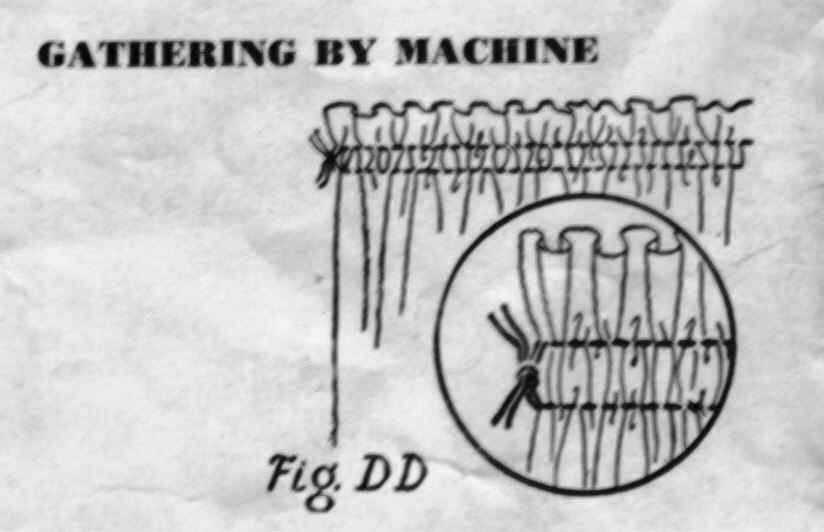
baste and top stitch in place. Step 7. Run gathering stitches across upper edge of apron, (see figure DD) Pull up gathers to measure 25 1/2"; fasten. Step 8 Turn in seam allowances on long edges of shoulder straps and back band; press. Step 9 Apply piping to these edges in same way as for apron ; baste and top stitch close to edges. Step 10 Turn in long edges and one end of each tie; finish in narrow machine hems. Fold a soft pleat in the raw end of each tie. Step 11. Lap the back extending corner of bodice over raw end of a tie, right sides up; baste in place. Step 12. Lap the upper front extending corner of bodice over the raw end of a shoulder strap, right sides up ; baste in place. Step 13. Lap the upper edge of the extending back corner of bodice over other raw end of shoulder strap, right sides up, back opening edges even; baste in place. Step 14. With centers matching , lap lower edge of bodice over gathered edge of apron, right sides up; baste, adjusting gathers evenly. Step 15. Top stitch close to all edges of piping on bodice, catching in ties and shoulder straps. Step 16. Attached back band to shoulder straps in back by placing raw ends of band under edges of straps, lower edge of band 5" up from ends of straps. Top stitch across straps, catching in back band. Step 17. Turn in seam allowance on all edges of pocket; press. Apply piping to upper edge of pocket in same way as for apron; baste and top stitch in place. Step 18. Place pockets in position on apron, top stitch close to edges. Step 19. Turn in seam allowance on all edges of cap; baste. Step 20. Apply piping in same way as apron; baste and top stitch close to edge.
 FIGURE
DD
FIGURE
DD
Gathering By Machine: Adjust machine stitch to 6 or 8 stitches to the inch. Run two rows of stitching along edge, one row on 1/2" seam line and the other 1/4" from edge. Pull stitching up to proper measurement by pulling bobbin threads of both rows at the same time. Pull top threads through wrong side; knot ends together. Distribute gathers evenly.
 Coverall Apron # 3 (sateen)
Materials: Sateen 1 3/4 yards, Sateen (in contrasting color) 3/8 yd. Threads to match
How to make patterns refer to PATTERN PAGE
Cutting directions: Front 1 piece Pattern No. 7 (pattern page) Back 1 piece, Pattern No. 8 (pattern page) Pocket 2 pieces Pattern No. 9 (pattern page) 1 of plain and 1 of contrast. Front Facing 1 piece, Pattern No. 10 (pattern page) of contrast. Back Facing 1 piece Pattern No. 11 (pattern page) of contrast. Ties two pieces, each 4"x 41"
Sewing Directions: Step 1. Fold each tie in half lengthwise, right sides together, stitch seam on long edge and one end. Trim seam, turn to right side. Step 2. With right sides up, baste the raw end of each tie to coverall at inside line of darts between X's as shown ( have end of tie extend over line 1/4") Step 3. Baste darts on wrong side, X's matching, stitch, graduating to single X's at top and bottom ( the tie end will be caught in with the stitching) Step 4. Place the two pocket sections right sides together . Stitch across upper edge and down each side to the X. Clip in to seam at ends of stitching. Trim seam, turn pocket right side out. Baste around raw side and lower edges. Step 5. Place pocket in position on lower edge of coverall, right side of pocket to wrong side of coverall, raw edges even. Stitch at side and lower edges. Clip in to seam at ends of stitching . Trim seam, turn pocket up to right side. Baste! flat. Top stitch to apron across center between the X's. Step 6. Baste and stitch shoulder seams, right sides together. Press Open. Step 7. Turn in all outer edges of coverall; turn in raw edge and finish with a double row of stitching. Step 8. Baste and stitch facing together at shoulder seams; press open. Step 9. Turn in outer edge of facing; stitch close to edge; press. Step 10. Baste facing to neck edge of coverall, neck edges and seams matching, right sides together. Stitch seam; at center front, stitch 1/8"each side of center, graduating down to X. Trim seam, slash down center front to X, turn facing inside. Press. Step 11. Cut two strips of narrow tape 17" long and sew an end of each tape at a corner of back at X. (narrow strips of self fabric may be prepared and used as tapes) Turn down free corners of pocket in cuff effect.
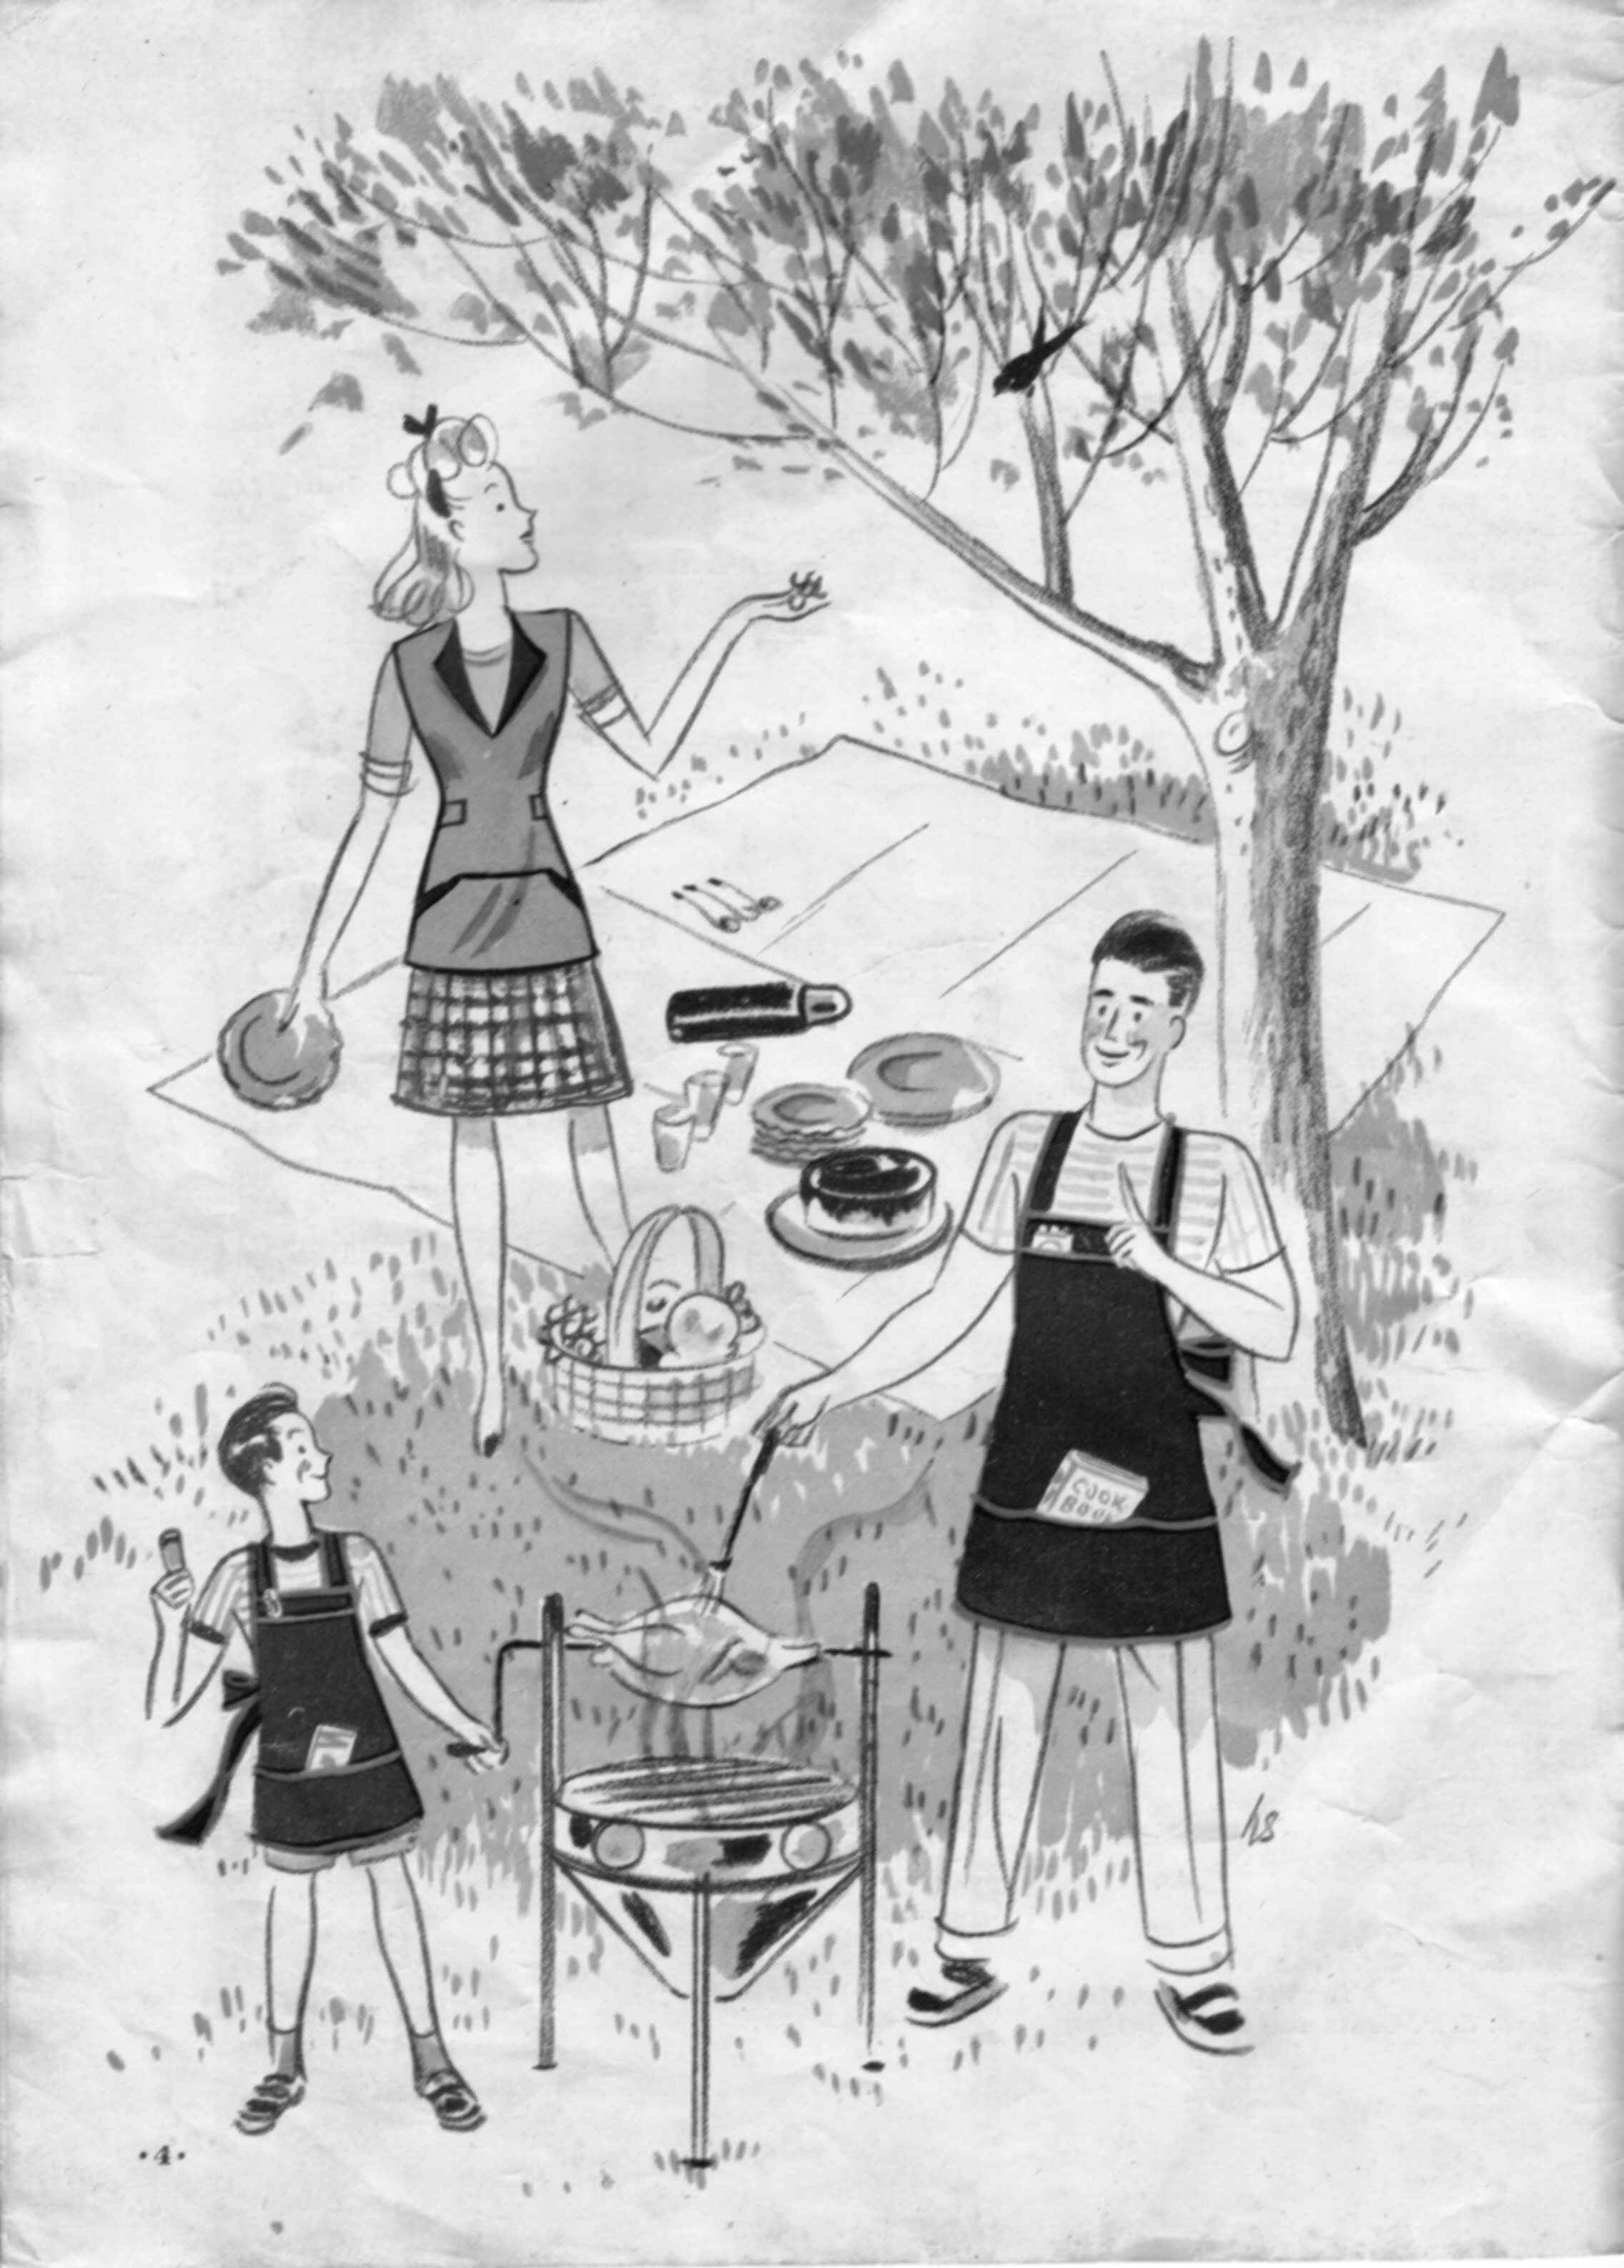
Father and Son Barbecue Aprons # 4 #5
Materials: Sturdy cotton denim, etc. Father = 11/4 yds Son = 5/8 yrd. Bias trim (double fold) in contrasting color heavy duty thread
How to make patterns refer to PATTERN PAGE
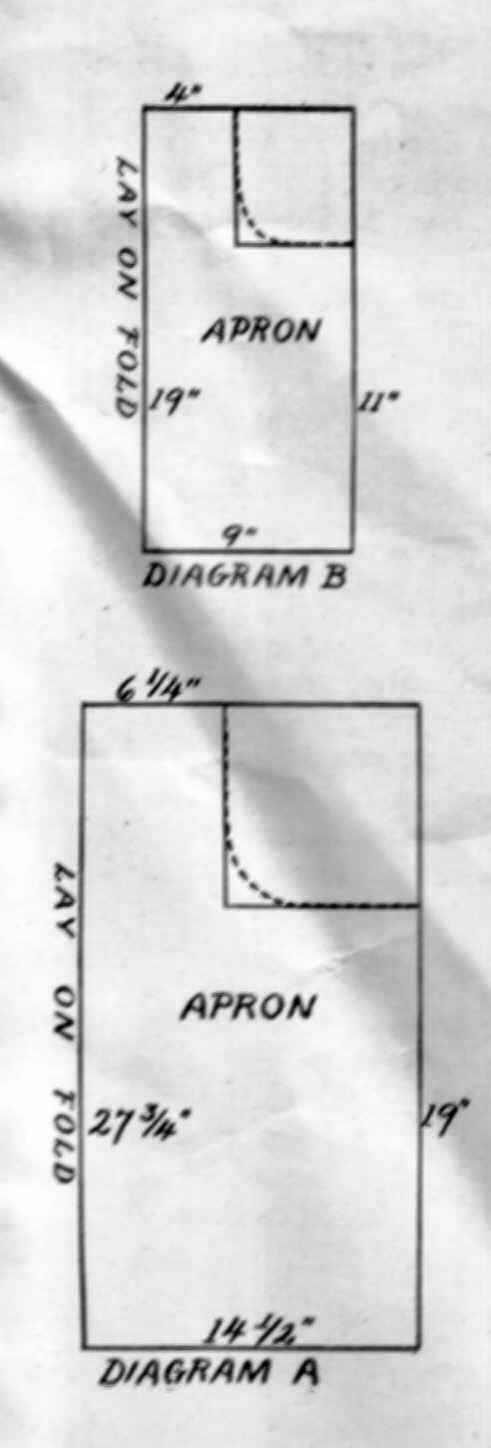
How to make patterns: Father Mark a section 14 1/2" X 27 3/4" Measure up to 19" from lower edge; mark point o side edge. On top edge , mark a point 61/4" from center. Square two lines from the two points to form a block as shown, Diagram A, shape side edge of apron as shown by broken line, Diagram A
Son Mark a section 9" X 19". Measure up 11" from lower edge; mark point on side edge. On top edge, mark a point 4" from center. Square two lines from the two points to form a block as shown, Diagram B Shape side edge of apron as shown by broken line, Diagram B Do not add seam allowance to patterns.
Cutting Directions: ( When cutting, place long straight edges of patterns at folds of fabric) Father- Upper Pocket 1 Piece 4" X 131/2" Lower Pocket 1 piece 10" X 29". Halter 1 piece 2" X 23". Ties 2 pieces 2" X 28"
Son- Upper Pocket 1 piece, 3" X 9". Lower Pocket 1 piece 6" X 18". Halter 1 piece, 1 1/2 X 18". Ties 2 pieces, 1/2 X 18".
Sewing Directions: Either Apron, Step 1. Bind one long raw edge of each pocket section with bias trim. Step 2. Turn in remaining long raw edge of upper pocket and press. Step 3. Place a lower pocket in place on apron, right sides up, lower and side edges even; baste. Place upper pocket in position on apron.
For father's, place 3" down from the top; for sons, place 2" down from top. Baste and top stitch close to lower edge. Step 4. Bind entire raw edge of apron, catching in edges of pockets. Step 5. Divide each pocket section into three equal parts; machine stitch through all thicknesses, forming three sections on each pocket. Step 6. Bind all edges of each tie pieces. Step 7. bind all edges of each tie piece Step 8. Baste end of halter in place on inside at top of apron, side edges even; top stitch. Step 9. Baste one end of each tie piece in place on inside at waistline of apron, top edges even ; top stitch.
 DIAGRAM
A and B
DIAGRAM
A and B
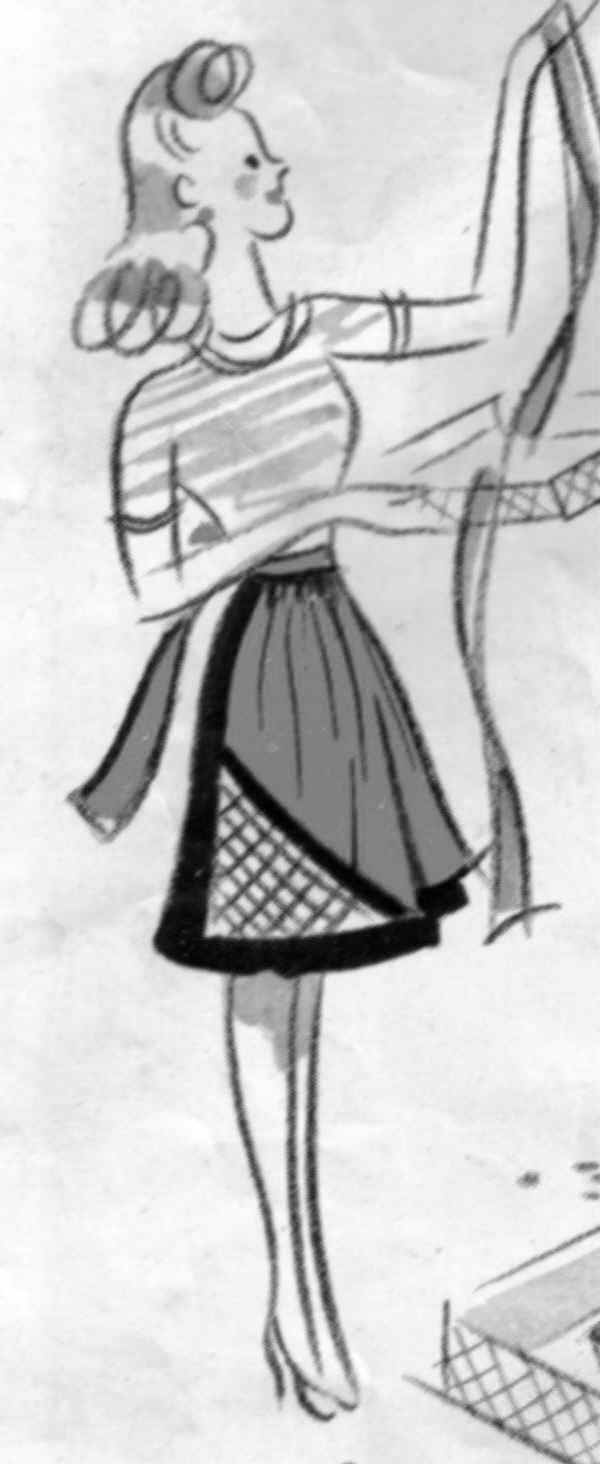
 Ruffled Apron # 6
Materials: plaid cotton 1 yd. Plain cotton (for ruffle) 1/4 yd., sewing threads to match
How to make patterns refer to PATTERN PAGE
Cutting directions: Apron 1 piece pattern # 12 (pattern page) Side and pocket sections 2 pieces Pattern # 13 (pattern page) Pocket facing sections 2 pieces pattern # 14 (pattern page) Waistband 1 piece 4" X 17 1/2". Ties 2 pieces, 3" X 29". Ruffle cut fabric for ruffle crosswise, into four equal pieces. Stitch short end together for a continuous strip.
Sewing Directions: Step 1. turn in one log raw edge of ruffle ; finish in a narrow machine hem. Run gathering stitches at other raw edge, see figure DD. Step 2. Baste gathered edge of ruffle along outline of pocket, continuing around outer edge of apron, have raw edges even; adjust gathers evenly and baste. Step 3. Baste and stitch pocket facing to apron ( over ruffle) at curved edge, right sides together ,raw edges even. Trim seam, turn pocket facing to inside ; press. Step 4. Turn seam allowance on outer edge of apron to right side ( over ruffle) keeping pocket facing free. Turn in raw edge; stitch close to edge, forming hem. Step 5. Clip in side edge, of side and pocket section to X; turn in raw edge above X; finish in a narrow machine hem. Step 6. On inside, place side and pocket section to pocket facing, raw edges even, wrong side up. Stitch together (keeping free from apron) as far as X on side edge; forming pocket. Step 7. Place side edges of apron and pocket together ( below pocket opening). ( If seam edge of pocket extends, turn in extension to form an even line with apron edge.) Stitch together for 1" through all thicknesses. Step 8. Run rows of gathering stitches at upper raw edge of apron ( see figure DD) Step 9. Turn in and press short ends of waistband. Step 10. Baste and stitch one long raw edge of waistband to raw upper edge of apron, right sides together; adjust gathers evenly; match centers and side edges. Turn waistband up; press seam up. Turn in remaining long raw edge of waistband and baste in place along seam line on wrong side ( leave ends of waistband open) Step 11. Finish one end and both long edges of each tie in narrow machine hems. Step 12. Fold a soft pleat on raw end of each tie and place each pleated end between open ends of waistband; baste. Step 13. On right side, top stitch close to edges of waistband through all thicknesses. Press apron.
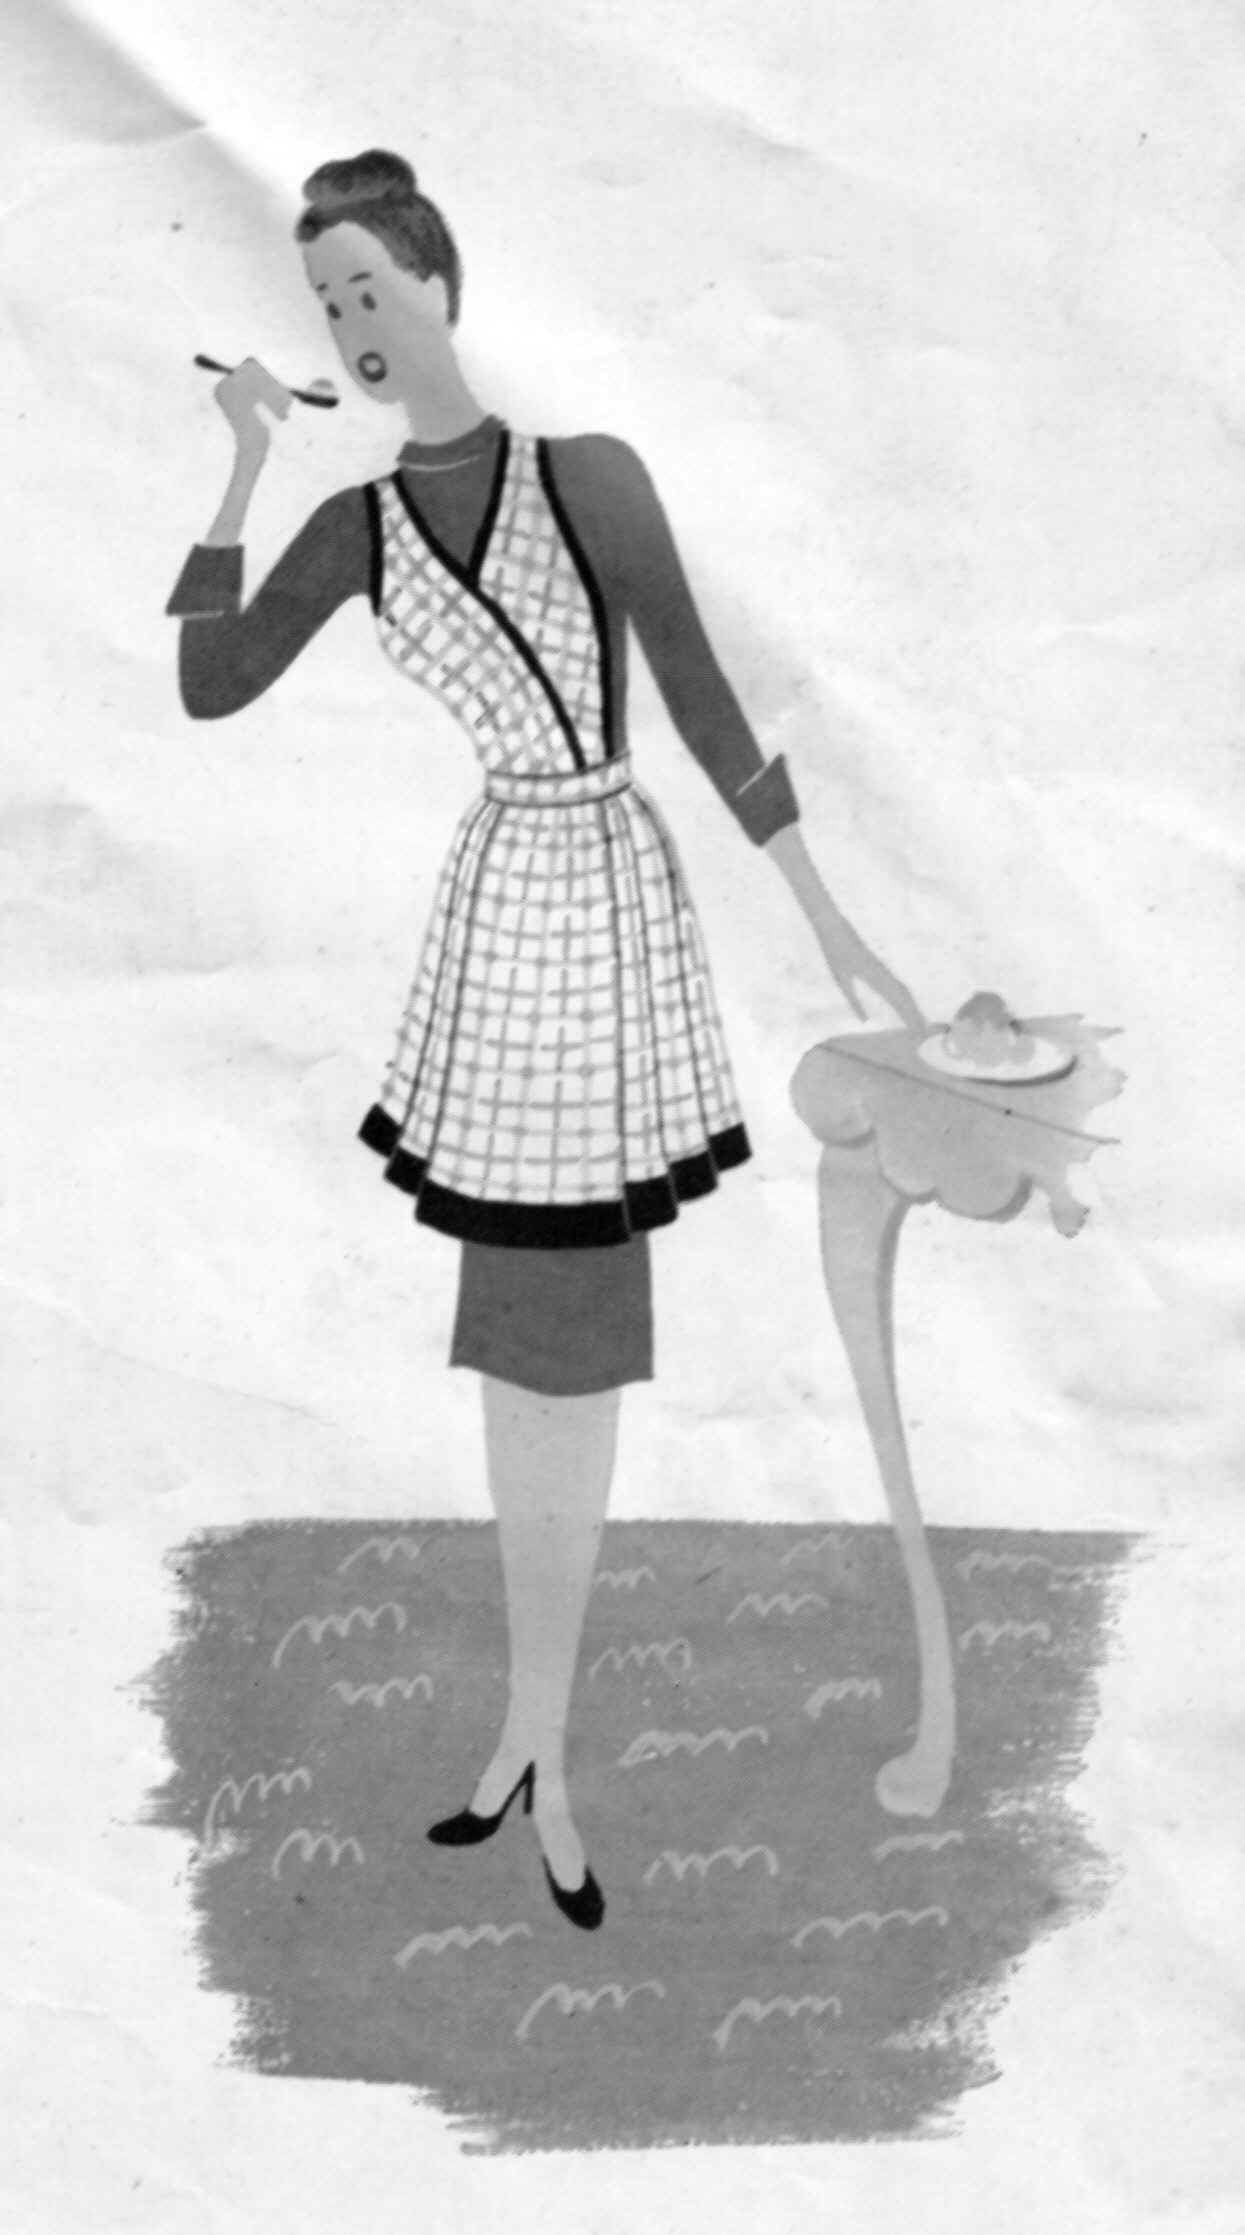 Party Apron (Taffeta) # 7
Materials: Checked Taffeta 1 1/4 yrds. , Pieces of black Taffeta, sewing threads tto match
How to make patterns refer to PATTERN PAGE
Cutting Directions: Halter Front 2 pieces, Pattern No. 15 (pattern page) Apron 1 piece, 19" long X 39" wide. Waistband 2 pieces 2 1/4" X 19". Ties 2 pieces 3 1/2" X 27" Halter Trimming 2 bias strips 1 3/4 " wide, one long enough to fit outer edge of completed halter and the other to fit inner edge ( if necessary).
Apron Trimming 1 straight strip, 3" X 39".
Sewing Directions: Step 1. Baste and stitch halter fronts, right sides together , at center back seam. Press seam open. Step 2. Turn in one long edge of each halter trimming and press. Step 3. Baste and stitch corresponding trimmings to inner and outer edges of halter, raw edges even, right side of trimming to wrong side of halter. Trim seams, clip curves, turn trimmings over to right side of halter. Baste and top stitch trimmings in place, close to turned edges. Step 4. Lap one halter edge over the other for a measure of 13 1/2" across waistline; baste together. Step 5. Turn in side edges of apron; turn in raw edges; finish in narrow machine hems.
Step 6. Turn in ends and one long edge of apron trimming; press. Baste and stitch raw edge of trimming to raw lower edge of apron, right side of trimming to wrong side of apron; have edges even at sides. Trim seam, turn trimming over to right side of apron. Baste and top stitch trimming in place close to turned edge.
Step 7. form three knife pleats on each side of apron, inner pleats 3" each side of center; form pleats deep enough so that waist measure ( at upper edge) is 18"
Baste pleats flat across upper edge; press. Step 8. urn in all edges of each waistband section; press. Step 9. Fold each tie in half length wise; stitch leaving one end open. Trim seam, turn tie to right side. Step 10. Matching centers and side edges, lap long turned edge of one waist band over upper edge of apron; baste in place.
Step 11. Matching centers, lap upper edge of attached waistband over lower raw edge of halter front; baste in place. Step 12. Place a raw end of each tie under turned ends of waistband and baste in place. Step 13. place remaining waistband in position on wrong side, all edges even. On right side top stitch close to all edges of waistband through all thicknesses, catching in halter ties.
 Sewing Apron # 8
Materials: Chintz 3/4 yard, Sateen in contrast, 1/2 yd., sewing threads to match.
How to make patterns refer to PATTERN PAGE
Cutting Directions: Apron 1 piece pattern No 16 (pattern page) chintz, Pocket facings 2 pieces pattern No. 16 (pattern page) following outline as indicated by broken line chintz. Apron facing 1 piece 18" long X 30" wide contrast fabric Waistband 1 piece 5" X 21" chintz Ties two pieces each 41/4" X 28" chintz
Sewing Directions: Step 1. Baste and stitch each pocket facing to a curved pocket edge, right sides together, raw edges even. Trim seam turn facing to wrong side. Press. Top stitch 1/2" from pocket edge through both thicknesses. Step 2. Baste and stitch apron facing to apron, right sides together, at side and lower edges;
leave upper edge open. Trim seam , turn apron right side out . press. Step 3. Run gathering stitches across upper edge of apron facing (see figure DD) ; pull up gathers to measure 20" ; fasten. Step 4. Run gatherings stitches across upper edge of apron in three groups (at two sides and across center) Step 5. Matching centers (apron facing and apron), pull up gathers so that measure across center on apron is 8 1/2 " ; pin. Pull up gathers at each side on apron so that measure is
3 1/2 " pin. Adjust all gathers evenly and baste raw upper edges together. Step 6. For gathering, waistband and ties see (Steps 8-13 from Apron #6)
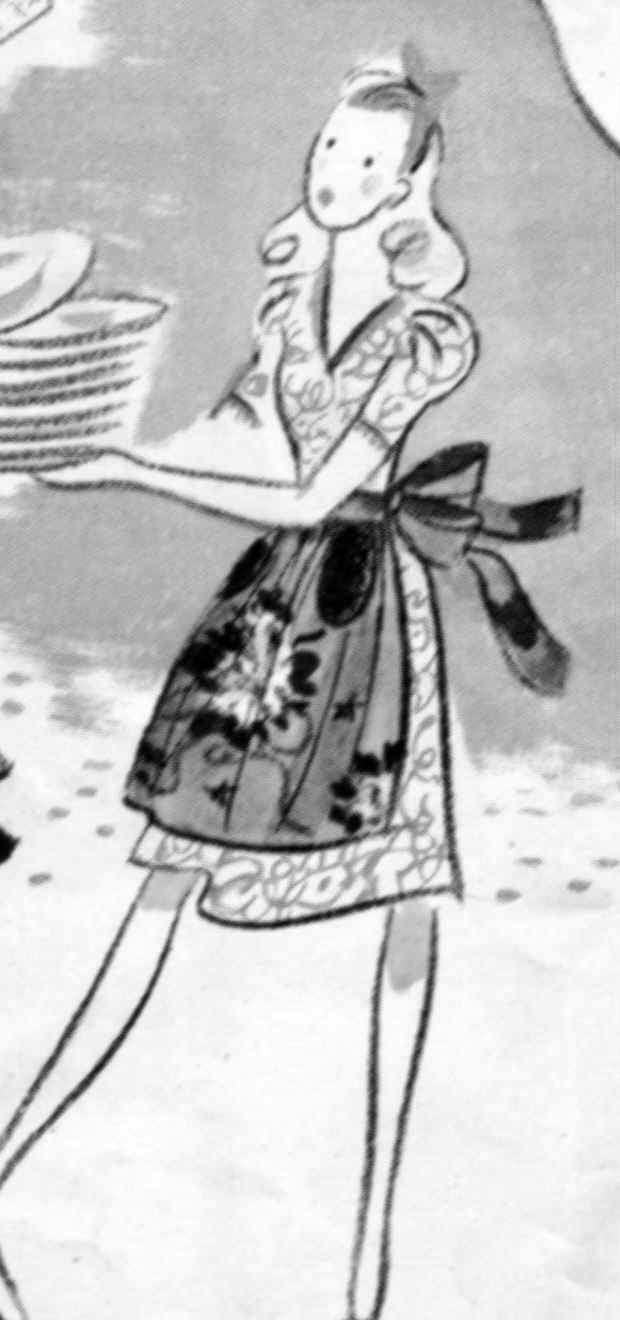
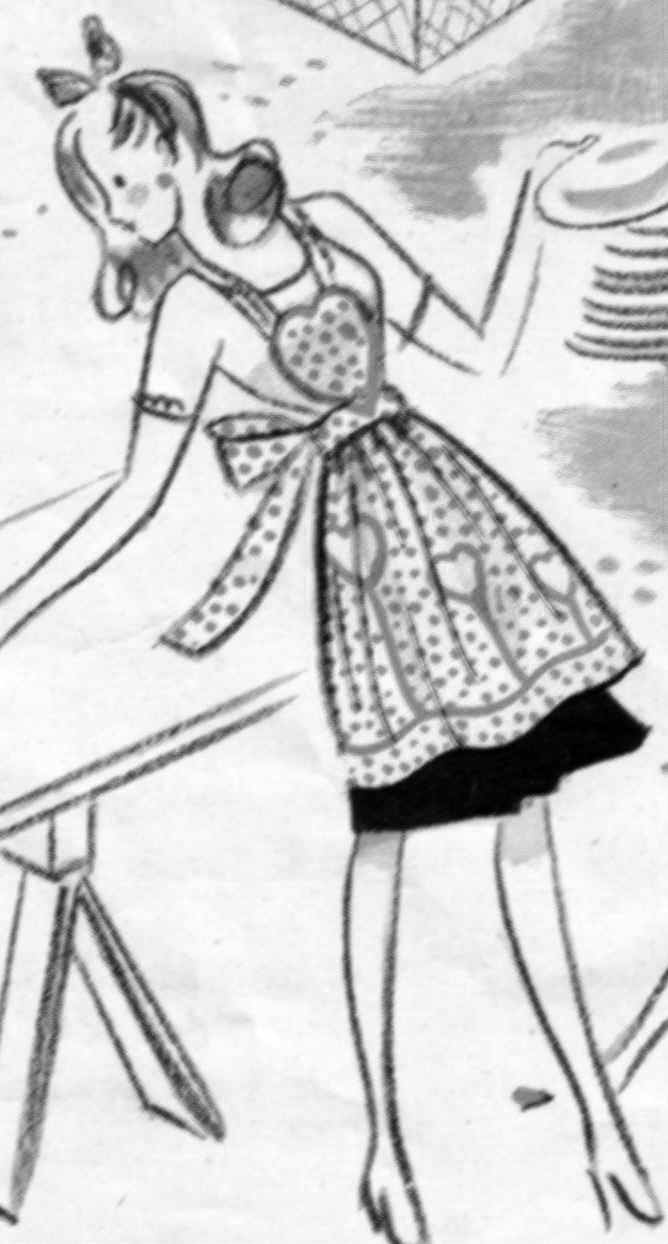 Heart Apron # 9
Materials: Polka dot cotton 1 yd., pieces of plain cotton, bias trim in color of Polka dot double fold, sewing thread to match
**How to make pattern: Pocket mark a section 4 1/2" wide X 5" long. Fold in half and cut a heart pattern as large a possible. Small Appliqued Hearts mark a section 4" wide X 4 1/2" long; follow directions for pocket. Bib mark an 11" square; follow directions for pocket.
Cutting Directions: 1/2" seams are allowed. Apron 1 piece, 24" long X 36" wide. Waistband 1 piece 4" x 18". Ties 2 pieces 3 1/2 X 25" Pocket 1 piece. Appliqued Hearts 2 pieces, Bib 2 pieces, Strap 1 piece. 3 1/2 " X 22".
Sewing Directions: Step 1 Turn in sides edges of apron and finish in narrow machine hems. Step 2. Turn up hem 3 1/2" ; turn in raw edge; machine stitch hem in place. Step 3. For gathering ties and waistband, see ( Steps 8-13 Apron No. 6) Step 4. Bind pocket and small hearts with bias trim . Place he two bib pieces, wrong sides together; baste. Bind same as for pocket. Step 5. For stem trimming, cut three pieces of bias trim- and 8 1/2" strip for pocket, and 6" and 3 1/2" strips respectively for appliqued' hearts. Press out and fold. Step 6. Place the corresponding stem strips in place on apron; top stitch close to edges. Step 7. Place pocket and appliqued' hearts in position (covering top ends of stems) ; baste and stitch, leaving upper edge of pocket open. Step 8. Press out center fold of bias. Place bias trim, right sides up, over stitching of hem; top stitch close to both edges through all thicknesses. Step 9. Fold each strap in half lengthwise, right sides together. Stitch seam, leaving an opening for turning. Trim seam , turn to right side; top stitch close to all edges. Step 10 . Lap upper edge of bib over ends of strap; top stitch across ends through all thicknesses. Step 11. Lap point of heart over waistband , centers matching. Top stitch point in place through all thicknesses.
 Apron With Pot Holder Corners #10
Materials: Apron cotton fabric 7/8 yd., Trimming quilted cotton (in contrasting color) If quilted fabric is not available, use pieces of cotton with sheet wadding between and quilt as shown under sewing directions, bias trim (contrasting color) double fold, sewing thread in matching colors.
Cutting Directions: Body of apron 1 piece 20" long X 36" wide. Waistband 1 piece, 4" X 18 1/2 ". Ties 2 pieces, each 3 1/2 " X 27". Trimming An 11" square of quilted fabric; cut the square diagonally from corner to corner forming two pieces.
Sewing Directions: 1/2" seams are allowed. Step 1. bind the diagonal edge of each quilted piece. To prepare your own quilting, place the two fabric pieces
(11" square) together with three layers of sheet wadding between . Mark first line of quilting on top fabric piece; use a cardboard gauge to space rows of quilting.
Working right side up, take tiny stitches one at a time through all thicknesses (see Fig. AA) If desired attach quilting foot to sewing machine and quilt, following machine instructions. (Bind diagonal edges see Step 1.) Step 2. Place a quilted piece to a lower corner of the apron, edges even, right side of quilted piece to wrong side of apron Step 3. Stitch sections together ( on each corner), ending stitching in line with binding on quilted piece. Clip in to seam at ends of stitching. Turn quilted pieces over to right side of apron. Baste and press. Top stitch along diagonal edge of each quilted piece close to bindings through all thicknesses.
Step 4. Turn in raw lower and side edges of apron; finish in narrow machine hems. Step 5. For gathering, waistband and ties, ( see steps 8-13 Apron #6)
 FIGURE
AA
FIGURE
AA
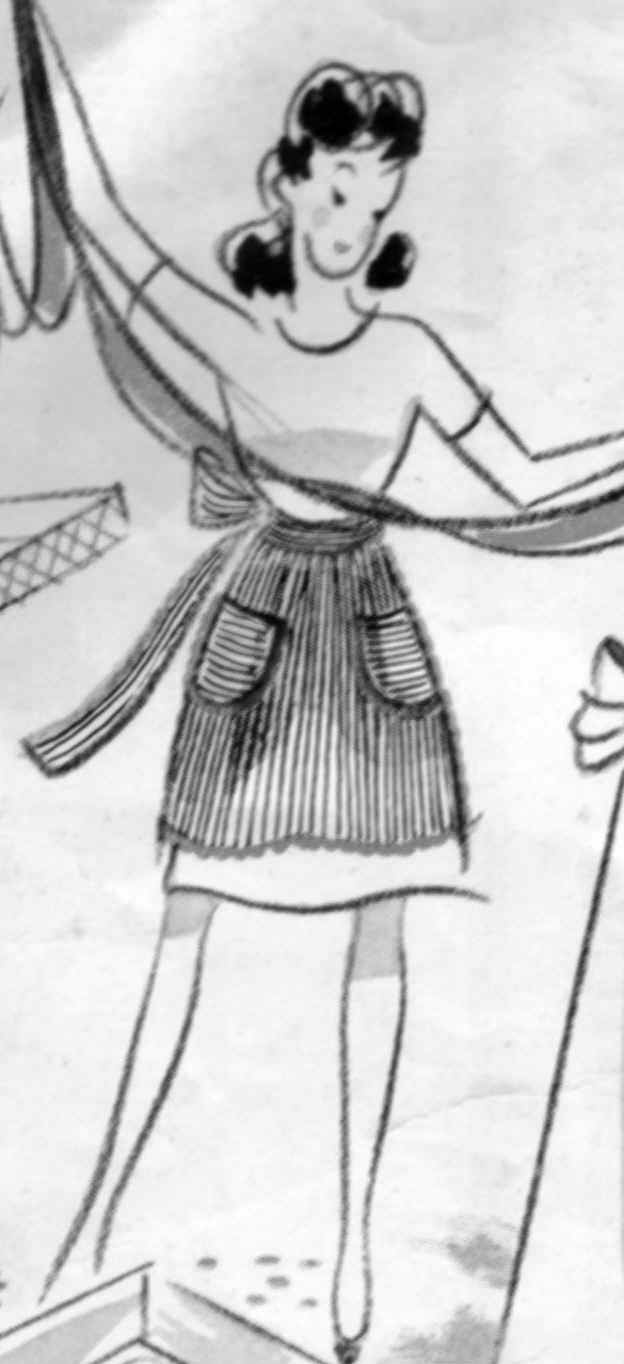 Ticking Apron with Yarn Trim # 11
Materials: Ticking, Denim, etc. 5/8 yd., Heavy duty thread, Yarn in contrasting color.
**How to make pattern: Apron mark a section 12" X 16". Measure in 1 1/4" from side edge and mark on top edge as shown by broken line Diagram C
Pocket mark a section 3 1/2 X8 1/2. Curve lower side edge as shown in Diagram D
Cutting Directions: 1/2" seams are allowed. Apron cut one section, placing straight edge at lengthwise fold of fabric. Pockets cut two sections, placing straight edge at crosswise fold of fabric. Waistband 1 section 3" X 18". Ties 2 pieces, each 2 1/2 X 20 1/2".
Sewing Directions: Step 1 Turn in side and lower edges of apron and finish in a continuous machine hem. Press. Step 2. For gathering waistband and ties (see steps 8-13 Apron # 6) Step 3. Turn in and press all edges of pocket. Turn down a 1" deep hem at top (straight) edge of pocket; stitch close to edge of hem.
Step 4. Place pockets in position on apron. Baste and top stitch 1/4" from edges. Step 5. To prepare yarn trimming, place strands of wool together to desired thicknesses. Thread a needle with yarn . Place trimming along edge of apron and attach to apron at 3/4" intervals with an overhand stitch pulling up stitches for a couching effect. Trim pockets in the same way.
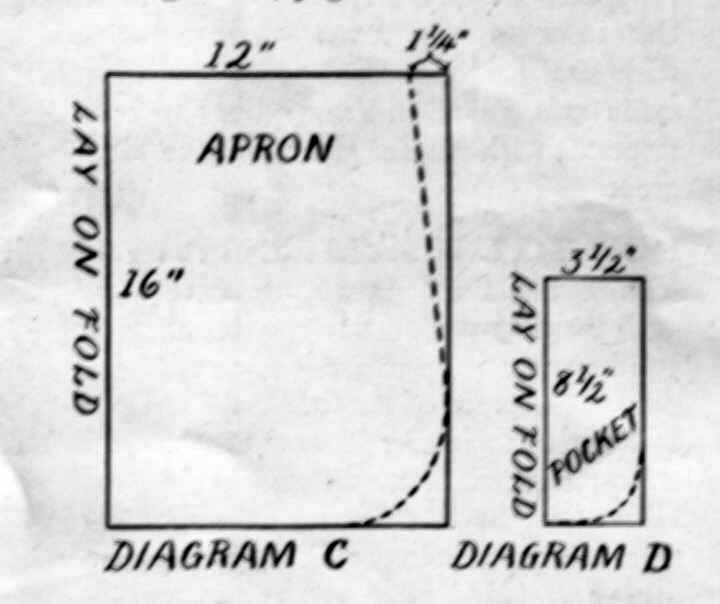 DIAGRAM C
and D
DIAGRAM C
and D
 Ball Fringe Apron # 12
Materials: cotton fabric 1 yd. ball fringe in contrasting color 1 1/8 yds threads in matching colors
Cutting Directions: Body of Apron 1 piece 24" long X 36" wide. Waistband 1 piece 4" X 18 1/2" Ties 2 pieces, each 3 1/2" X 27".
Pocket 1 piece 6 1/2" X 7 1/2"
Sewing Directions: 1/2" seams are allowed. Step 1. turn up a 5" hem at lower edge of apron. Turn in raw edge and machine stitch close to edge. Press.
Step 2. For gathering, waistband and ties ( see steps 8-13 Apron #6) Step 3. turn in and press all edges of pocket. At one 7 1/2" edge (top edge) turn in a 1" hem. Machine stitch close to side and lower adges of hem. Step 4. Run rows of gathering stitches across lower edge of pocket hem 1/4" apart. Pull up gathers to measure 4 1/2" ; fasten. Step 5. Place pocket on apron in desired position; baste. Top stitch close to side and lower edges (leave ruffled top free) Step 6. Place fringe in position on right side of apron covering stitches of hem. (turn in ends for clean finish) Stitch close to upper edge of trimming. Step 7. Trim pocket with fringe the same way , covering gathering stitches.
 Peasant Apron # 13
Materials: Cotton fabric ( print and plain) Rick Rack in two colors ( match two colors in print), sewing threads in matching colors
Cutting Directions: Upper section 1 piece 10" long by 36" wide (of print) Lower section 1 piece 6 1/2 " long X 36" wide (of plain) .
Waistband 1 piece 4" X 18 1/2" (of plain). Ties 2 pieces, each 3 1/2 " X 27" (of plain).
Sewing Directions: 1/2" seams are allowed Step 1. Baste and stitch upper and lower apron sections, right sides together , at one long edge press seam down. Step 2. Finish lower edge of apron in a narrow machine hem. Step 3. For gathering waistband ( See step 8-13 Apron # 6) Step 4. Place rick rack upon lower edge of lower section on right side; stitch through center . Repeat with same color 3 1/2" above. Place second color rick rack between, spacing evenly.
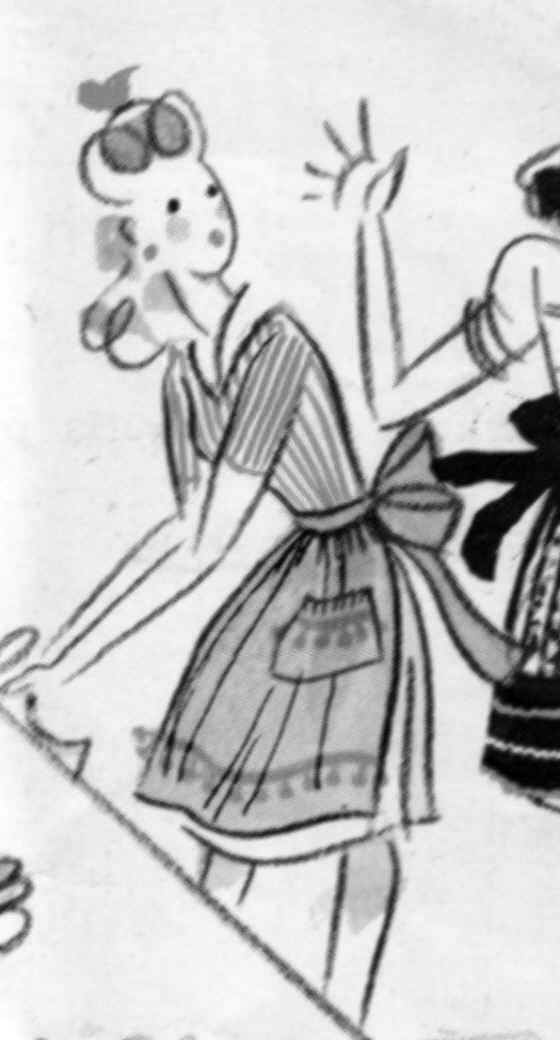
 Mother & Daughter Aprons # 14 & # 15
Materials: Cotton fabric in two contrasting colors, Bias trim single fold ( in a third contrasting color) sewing threads to match
Pattern Directions: Mother (1/2 " seams are allowed) Mark a section 7" X 13". At lower edge, measure over 5 3/4" ; mark. Shape pattern as indicated by broken line, Diagram E.
Daughter Mark a section 4 1/2 " X 9". At lower edge, measure over 3 1/2"; mark. Shape pattern as indicated by broken line Diagram F
To divide bibs into three sections (upper, middle, and lower), mark off and divide as indicated by broken lines, Fig BB and CC
( 1/2" seams must be added to the cut edges when cutting in fabric.)
Cutting Directions: Mother apron -upper section 1 piece 13" long X 36" wide. Middle Section 1 piece, 8 1/2" long X 36" wide ( contrast color)
Lower section 1 piece 6 3/4" long X 36" wide . Waistband 1 piece, 6" X 18 1/2" .Ties 2 pieces each 3 3/4" X 27". Bib -upper, middle, and lower sections cut one piece each; middle section is of contrast color; lay on fold see Diagram E.
Cutting Directions: Daughter apron - upper Section 1 piece 6 1/2" long by 36" wide. Middle section 1 piece 6" long by 36" wide. (contrast color)
Lower section 1 piece 4" long X 36" wide. Waistband 1 piece 3 1/2" X 17 1/2". Ties 2 pieces each 2 1/2" X 17" Bib- See Mother Apron.
Sewing Directions: Either Apron Step 1. Baste and stitch apron sections, wrong sides together . Trim seams; press open.
Step 2. Place bias trim over seams on right side and to stitch close to both edges of trim. Step 3. Turn in side lower edges of apron and finish in narrow machine hems. Step 4. For gathering waistband and ties ( See step 8-13 Apron # 6) Bib- Step 5. Baste and stitch sections wrong side together. Trim seams; press open.
Step 6. cover seams with bias trim same as for apron. Step 7. Lap upper edge of waistband over bib, lower edge of bib at lower edge of waistband; match centers; baste. Step 8. Top stitch across waistband ( over original stitches) at upper and lower edges through all thicknesses.
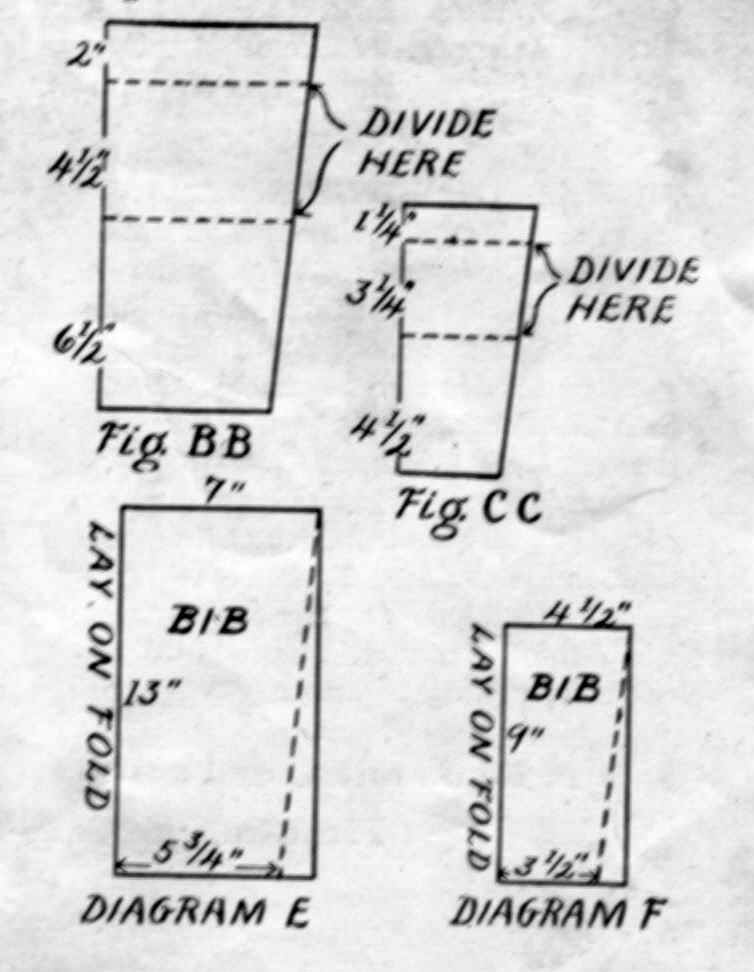 FIG BB, FIG CC, DIAGRAM E., DIAGRAM F.
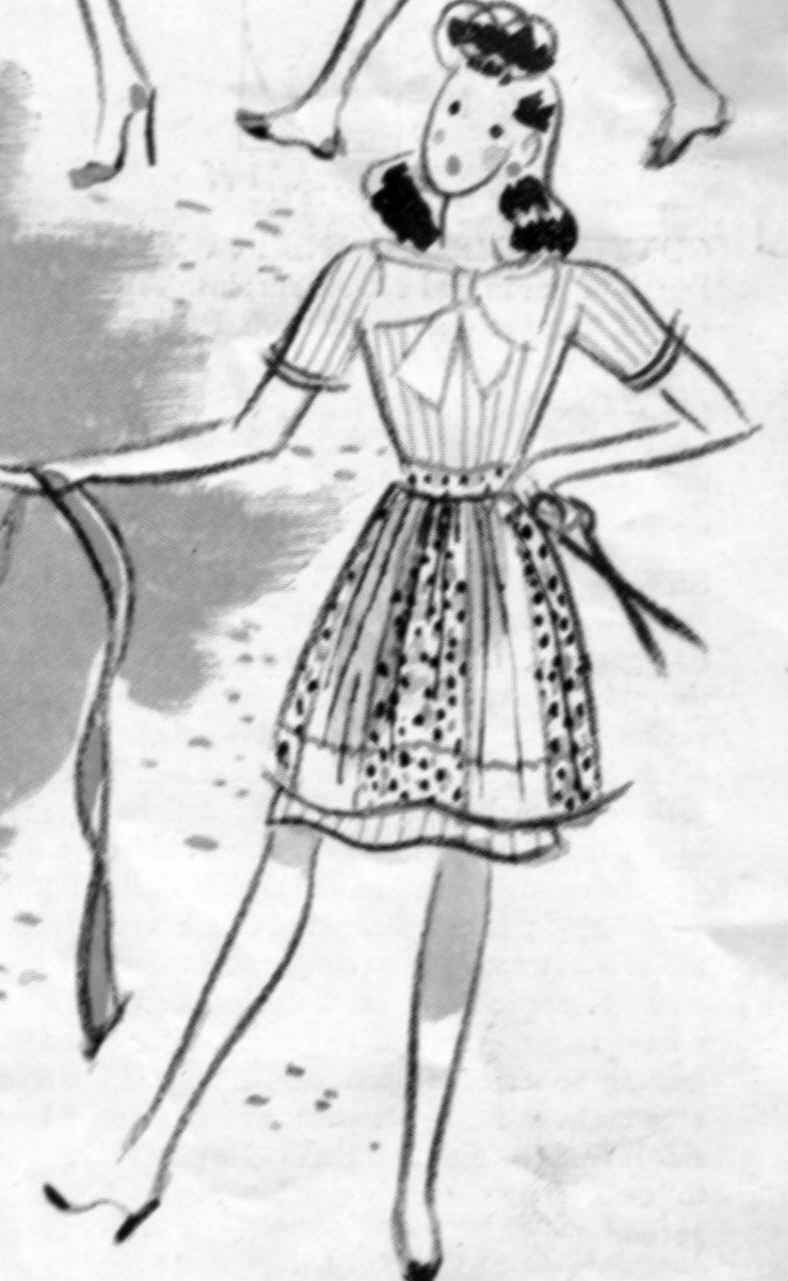 Dimity and Organdie # 16
Materials: Flowered Dimity, White Organdie, Rick Rack, ( in a color of the print) sewing threads to match
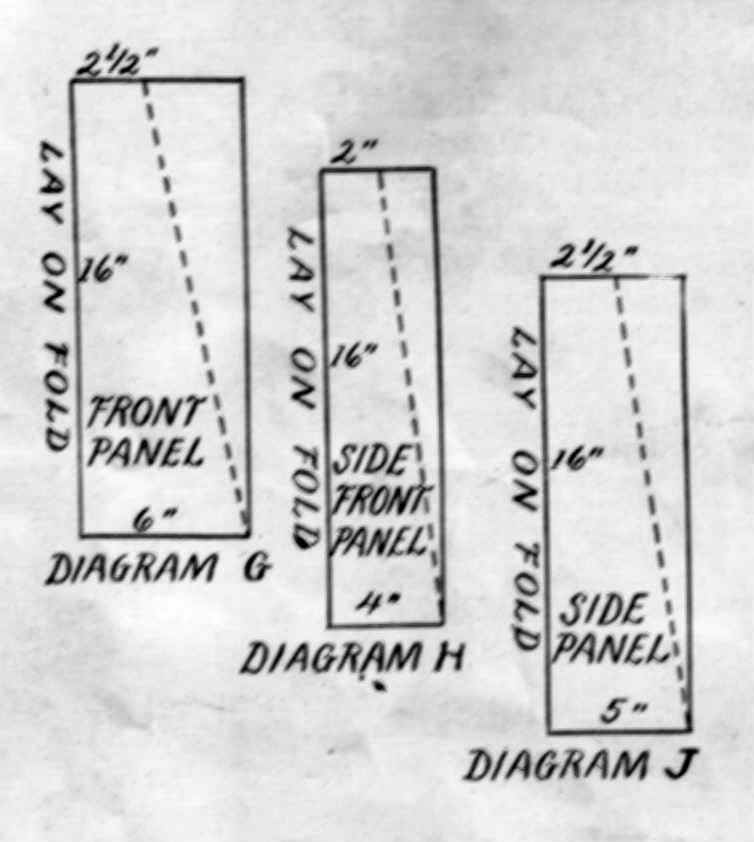
How to Make Patterns: Front panel mark a section 6" X 16" At top edge, measure over 2 1/2" ; mark. Shape pattern as indicated by broken line, Diagram G
Side front panel Mark a section 4" X 16". At top edge, measure over 2" ; mark. Shape pattern as indicated by broken line, Diagram H
Side Panel Mark a section 5" X 16". At top edge, measure over 2 1/2"; mark. Shape pattern as indicated by broken line, Diagram J
Cutting Directions: Front Panel 1 piece ( of print); place straight edge at fold of fabric. Side Front Panel pieces ( of organdie); place straight edge at fold of fabric. Side panel 2 pieces ( of print) Waistband 1 piece, 5 1/2" X 14" ( of print). Ties 2 pieces each 3 3/4" X 20" ( of print).
Sewing Directions: 1/2 " seams are allowed ( join seams of apron in french seams) Step 1. Join seams of apron together, alternating fabrics. Step 2. Turn in side and lower edges of apron; finish in narrow machine hems. Step 3. For gathering, waistband and ties, see ( steps 8-13 Apron # 6) Step 4. place rick rack around edges of waistband and stitch in place through center. Step 5. Place one row of rick rack along lower edge of apron ; stitch through center. Finish with second row placing 2" above.
 DIAGRAM
G, DIAGRAM H , DIAGRAM J
DIAGRAM
G, DIAGRAM H , DIAGRAM J
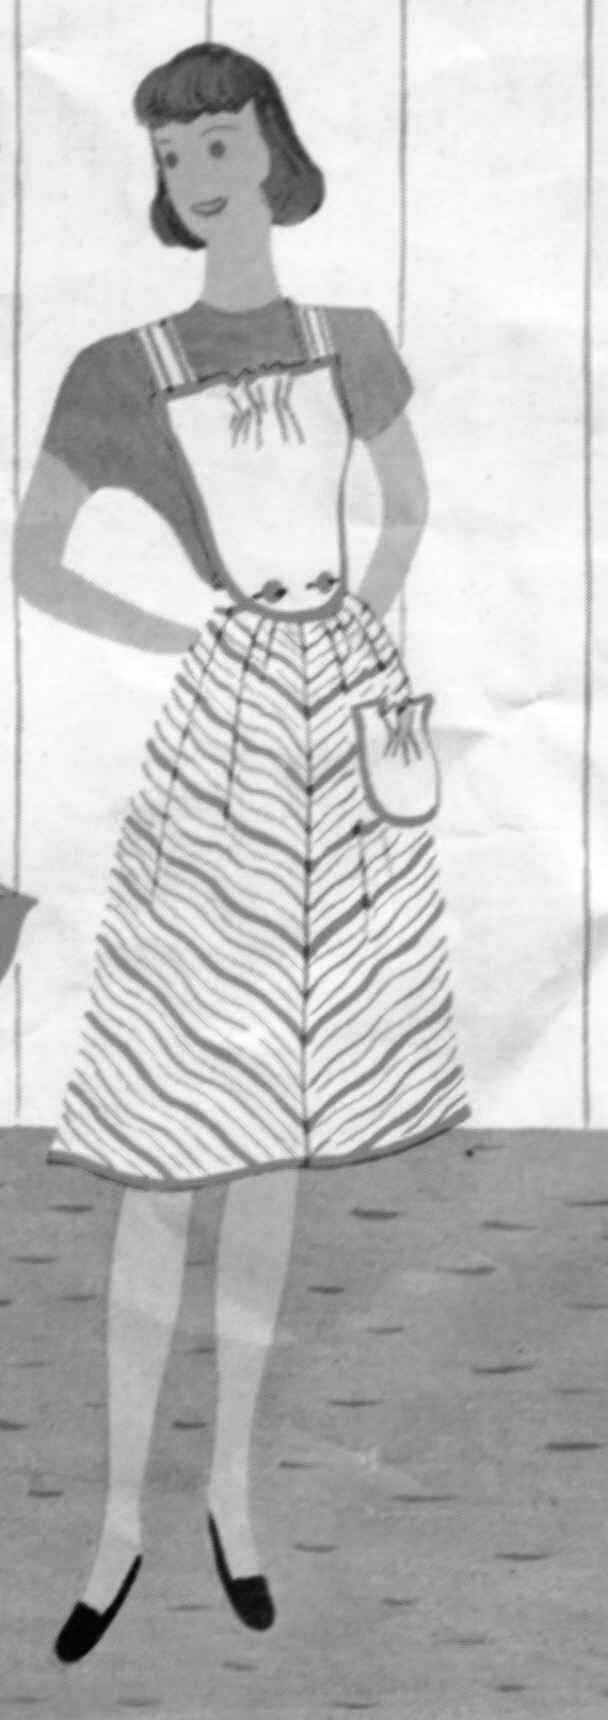 Make Over (M.O.) Apron # 17
* Note these aprons ( M.O. # 17-#19 ) are made from discarded dresses. The blouse is removed from the skirt and one seam of the skirt
( center front, center back or side seam) is opened. * A waistband, ties, and straps are cut from the surplus on the lower edge of garment or from blouse. A pocket and bib are cut from a contrasting color fabric and the apron is trimmed with bias trim ( double fold) in a color of the dress. Sewing thread in matching colors are used for all the make-over aprons. Patterns for the pocket and bib are explained below under " How to make patterns"
How To Make Patterns: Pocket mark a section 5 1/2" wide X 9" long. Shape side and lower edge in a curve as shown in Diagram K, by broken line.
Bib follow same procedure as for pocket, marking a section 6" X 14 1/2". (Do not add seam allowance to pattern pieces)
Cutting Directions: Apron Mark a desired length of apron and cut off surplus. Trim off old seam allowance on opened seam.
Pocket and Bib Cut one each, laying straight edge on fold of fabric. Waistband 1 piece, 5" X 20 1/2" ( piece if necessary)
Ties 2 pieces, each 3 1/2" X 27" (piece if necessary) Straps 2 pieces 1 1/2" X 20" (piece if necessary)
Sewing Directions: Step 1. Bind side and lower edges of apron with bias trim. Step 2. For gathering waistband and ties, see ( Steps 8-13 Apron # 6)
Bind pocket, bib and straps with bias trim. Step 4. Mark lengthwise center of pocket and bib. Run gathering stitches across pocket and bib ( about 1/4" from upper edges) 2" each side of center ( a continuous 4" gathering stitch). Pull up gathers to 2 1/2" ; fasten Step 5. Near lower edge of bib work two crosswise buttonholes, ends of buttonholes about 1 1/2" from center. Step 6. Place pocket in position and top stitch close to edges, leaving upper edge open. Step 7. Sew an nd of each strap at an upper corner of bib ( on wrong side) Step 8. Finish waistband with two buttons to meet buttonholes on bib. Button bib onto apron.
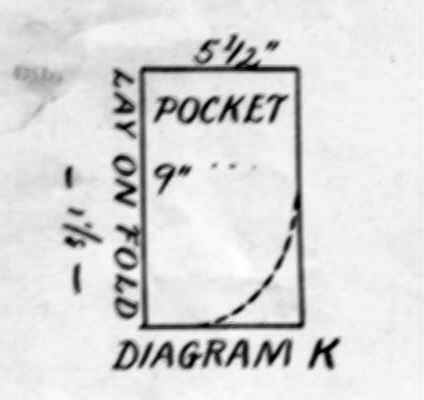 DIAGRAM K
 Make Over (M.O.) Scalloped waistband # 18
* See note for Apron # 17 to *, for preparation of apron. Waistband is of a contrasting color fabric and instruction for making pattern is given below.
Waistband is trimmed with bias trim ( double fold) in a third contrasting color
How to Make Pattern: Mark a section 3" X 8". Shape upper and lower edges in scalloped outline as indicated by broken lines, Diagram L
Cutting Directions: Mark desired length of apron and trim off surplus. Trim off old seam allowance on open seam. Waistband 1 piece ( lay on fold).
Ties 2 pieces, 4" X 19" ( cut from surplus)
Sewing Directions: Step 1. Turn in all edges of apron and finish in narrow machine hems. Step 2. Measure down 1 1/2" from top edge of apron; mark. Measure again 3" from top and mark. Run a gathering stitch across apron through each mark. Pull up gathers to fit waistband; fasten. Step 3. Turn in long edges and one end of each tie and finish in a narrow machine hem. Step 4. Lap raw end of each tie over a side edge of apron, right sides up, to fit between the two rows of gathers.
Fold soft pleat in end of tie ; baste ends in place. Step 5. Bind all edges of waistband with bias trim. Step 6. Place waistband on apron, right side up, upper and lower edges of waistband covering gathering stitches. Top stitch close to edges of binding on waistband through all thicknesses.
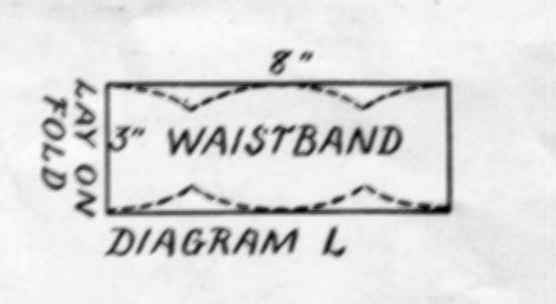 DIAGRAM L
 Make Over ( M.O.) Coverall Apron # 19
This coverall is made from a discarded one - piece dress with plain front and back blouse.
Preparation: Mark center front of dress from neck to hem, Cut along this mark. Each blouse front is cut on a diagonal line from shoulder to shoulder ( at neck)
to waistline at center front . Trim out neckline of back in a shallow oval curve, being careful to match neckline of front and back evenly at shoulder. Remove sleeves and trim each armhole 1/2" inside original armhole.
Sewing Directions: Step 1. Turn in neck and open edges and finish in a continuous narrow machine hem. Step 2. Finish armhole edges in same way. Press coverall. Apron is worn reversed, the back to the front and the opening edges in back. Close opening edges at waistline with a hook and eye. Wear original belt.
 Mother And Daughter Pinafores # 20 and # 21
Materials: Plain Fabric, Flowered Chintz, Bias Trim Double Fold ( in contrasting color) Sewing threads in matching colors.
Yardages: Mother- 3/4 yd (plain); Chintz 5/8 yd. Daughter- 1/2 yd. (plain); Chintz 3/8 yd.
How to make Bodice pattern refer to pattern page
Cutting Directions: Do not add seam allowance to patterns, Mother Bodice Front- 1 piece Pattern No. 17 ( pattern page) Bodice Back 2 pieces Pattern No. 18 ( pattern page) Apron 1 piece 21 1/2" long X 36" wide. Apron band 1 piece 6" wide X 36" long.
Daughter Bodice front 1 piece Pattern No 19 ( pattern page) Bodice Back 2 pieces, pattern No. 20 ( pattern page) Apron 1 piece 10 1/2" long X 36" wide.
Apron band 1 piece, 3/4" long X 36" wide.
Sewing Directions: Either pinafore Step 1. baste and stitch the darts on front bodice, right sides together as shown by X's; graduate to single X's at points.
Press darts on each back and bodice in same way. Step 2. Baste and stitch side seams of bodice, right sides together. Press open. Step 3. Press out center fold of bias trim. Arrange in looped design down center front of bodice; shrink out fullness on inner curved edge. Step 4. Bind back opening edges and neckline of bodice with bias trim. Bind armholes in same way. Step 5. Baste and stitch apron band to lower edge of apron, wrong sides together. Press seam open. Turn seam allowance on lower edge of band to right side; press Step 6. Press out center fold of bias trim and apply over seam of apron and band and again across lower edge of band, Top stitch close to both long edges. Step 7. Bind side aprons with bias trim Step 8. Run gathering stitches at upper edge of apron see Figure DD pull up gather to fit between side seams. Step 9. Baste body and apron, wrong side together; adjust gathers and match centers and side seams Step 10. Bind lower edge of bodice, continuing to catch edges of bodice and skirt in with binding Step 11. Form a bow tie of bias trim and tack at center front at waistline. Step 12. cut four strips of bias trim ( for back ties) Sew a tie at opening edges at neckline and at waist.
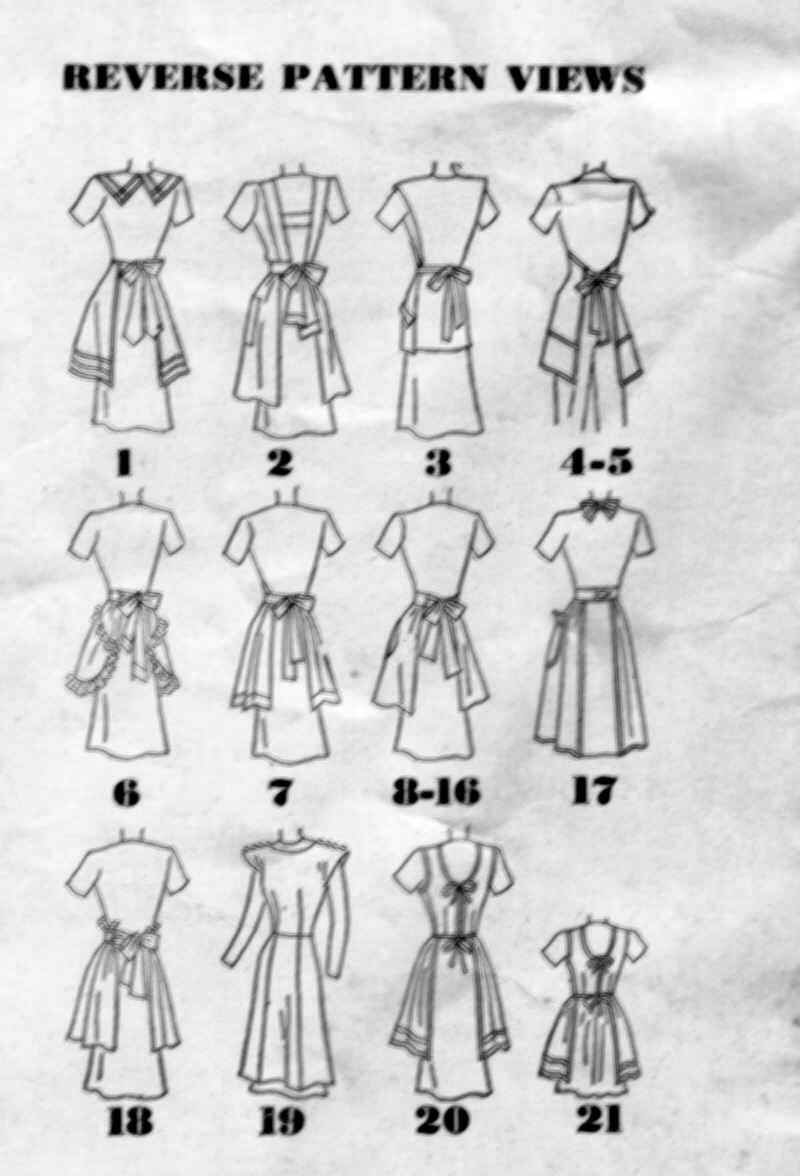 BACK
APRON VIEWS
BACK
APRON VIEWS